From 2D to 3D
Tabletop Simulator is a program for the computer that lets you play and interact with virtual board games. The game sports a physics engine in a 3D environment. While the game has a good library of common objects the need may arise for a custom piece. In my case I choose a non-standard Meeple piece from The Game Crafter called a "People".
Here is a quick tutorial to get 2D shapes into the program as 3D models.
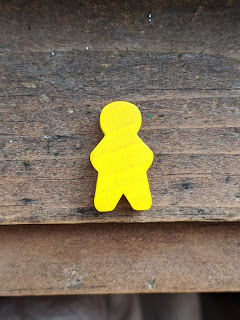
Firstly, I start by taking a picture of the object as flat and square on as I can. I put it near the window for natural lighting.
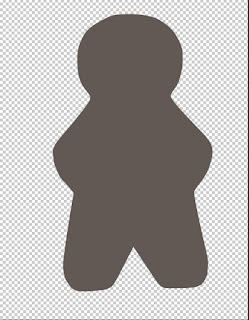
Next, I opened the file into Photoshop and created a new blank layer on top of it. I changed the alpha blending of the original layer so that I could better see both layers at the same time. Using the Pen Tool I clicked around the shape to define its shape. This created a path that was the same shape as the outline of the "People". Then I filled in and created a shape out of this new path. There is a good article here on that: here.
Since I free-handed the pen tool the shape is not perfectly symmetric.
To deal this with I duplicated and rasterized the layer. Then I chopped
off the left half. I took the right half, duplicated it, mirrored it,
and lined it up again. Now the "People" has perfect vertical symmetry. At this point I can save a transparent PNG file.
You can also start at this point if you already have a PNG.

 Using one the Section Tools (Quick Select) I highlight this shape. Then from the top 3D menu I choose "New 3D extrusion from selected layer". You cannot choose this option if you don't have something highlighted. A new 3D layer is created. Now from the 3D menu again I choose "Export 3D Layer" and save as an .OBJ file. If you have a look at this file in a text editor you'll notice that it is really just a bunch of ASCII vector coordinates and positions. In other words the contents of the file is human readable.
 I tried to import the .OBJ file directly into Tabletop Simulator with some really funny results. The jumbo meeple was initially larger than the table! I did what I could to scale it down to what you see on the right. Notice the weird texture of the surface? This is what happens when you "repair" the .OBJ file.

In order to have the piece display correctly in Tabletop Simulator it must be at the origin, laying down flat, and resized much smaller. Therefore, I use the default Windows 3D Builder app. I open the new .OBJ file that Photoshop made and Import it. You'll notice a message about objects that are invalid. IGNORE this message and do not repair it (more on this later). Click the object and the toolbar at the bottom will appear. Resize the object down to about 1mm and lay it down flat. Check again that the position is 0, 0, 0 (origin).


Here is the URL from my "People": https://pastebin.com/raw/8zuncvQB
Back in Tabletop Simulator go to Objects / Custom / Model and drag a new element into your game. Under the MODEL tab paste the URL from pastebin.com. I choose Figurine from the available choices below. To further enhance the model there are other optional fields like Diffuse, Bump, Collider, etc.

Here is the final product along side some more standard Meeples for comparison.


Comments
Post a Comment